-
React Props, State 이해 및 사용법Programming/React 2020. 5. 8. 09:00반응형
Props / State
props 와 state는 React에서 데이터를 사용할 때 다루는 개념이다.

실습
코드샌드박스(https://codesandbox.io/s/dank-pond-pfyvq) 를 사용하여 실습
Props
props는 부모 컴포넌트가 자식 컴포넌트에 값을 전달할 때 사용하는 것이다. 읽기 전용
src 폴더 구조

CodeSandBox에서 리액트를 실행 시키면 MyName.js를 제외한 파일은 기본적으로 생성이 된다.
MyName.js는 props 예제를 위해 만든 파일
App.js
import React, { Component } from "react";
import "./styles.css";
import Name from "./Name.js";

class App extends Component {
  render() {
    return <Name first="chanho" last="yoon" />;
  }
}

export default App;
Nams.js를 import하여 Name 컴포넌트(자식)로 render해주고 props 값으로 first 와 last 값을 전달하였다.
Name.js
import React, { Component } from "react";

class Name extends Component {
  render() {
    console.log(this);
    const { first, last } = this.props;
    return (
        <span>
          이름 : {first} {last}
        </span>
    );
  }
}
export default Name;
브라우저에 보이는 결과 Name.js 파일을 만들어 Name 컴포넌트를 만든다. Class 컴포넌트에는 render() {} 함수가 꼭 필요하다. 그리고 jsx를 return 해줘야함
Name(자식) 컴포넌트에서 App(부모) 에서 보내온 props를 받아 사용한다.
console.log(this)를 해보면 브라우저 콘솔창에 아래와 같이 부모 컴포넌트에서 어떠한 Object가 넘어왔는지 알 수 있다.

console.log(this) 또한 default props를 설정해줄 수 있는데 아래와 같이 자식 컴포넌트에 props를 실수로 빠드리거나 잘못 입력 했을 때
app.js
import React, { Component } from "react";
import "./styles.css";
import Name from "./Name.js";

class App extends Component {
  render() {
    return <Name />;
  }
}
export default App;
name.js
import React, { Component } from "react";

class Name extends Component {
  static defaultProps = {
    first: "defaultProps 값 전달 : first",
    last: "defaultProps 값 전달 : last"
  };
  render() {
    return (
      <span>
        이름 : {this.props.first} {this.props.last}
      </span>
    );
  }
}
export default Name;
import React, { Component } from "react"; class Name extends Component { render() { const { first, last } = this.props; return ( <span> 이름 : {first} {last} </span> ); } } Name.defaultProps = { first: "defaultProps 값 전달 : first ", last: "defaultProps 값 전달 : last" }; export default Name;위와 같이 static defaultProps를 class 내부에 선언 및 사용하여 props 값에 default 값을 줘서 잘못 전달된 props를 찾아내거나, 기본적인 값을 사용할 수도 있다.
다른 방법으론 하단에 classname.defaultProps = {} 값으로 줄 수도 있다.

State
state는 컴포넌트 자기 자신이 가지고 있는 값이다. 변화가 필요할 경우 setState()함수를 통해 값을 변경해줄 수 있다.
src 폴더구조

State 예제
app.js
import React, { Component } from 'react';
import Counter from './Counter';

class App extends Component {
  render() {
    return <Counter />;
  }
}
export default App;
Counter 컴포넌트를 import 하고 render 함
counter.js
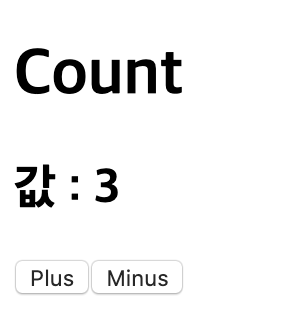
import React, { Component } from 'react';

class Counter extends Component {
  state = {
    number: 0
  };

  handleIncrease = () => {
    this.setState({
      number: this.state.number + 1
    });
  };
  handleDecrease = () => {
    this.setState({
      number: this.state.number - 1
    });
  };
  render() {
    const { number } = this.state;
    return (
      <div>
        <h1>Count</h1>
        <h2>값 : {number}</h2>
        <button onClick={this.handleIncrease}>Plus</button>
        <button onClick={this.handleDecrease}>Minus</button>
      </div>
    );
  }
}

export default Counter;
위와 같이 화살표 함수(arrow function)를 사용한 이유는 일반적인 function handleIncrease() {} 사용했을 경우 this가 뭔지 모르게됨

해결 방법은 아래와 같다.
class Counter extends Component {
  state = {
    number: 0
  };

  constructor(props) {
    super(props);
    this.handleIncrease = this.handleIncrease.bind(this);
  }
  handleIncrease() {
    console.log(this)
    this.setState({
      number: this.state.number + 1
    });
  }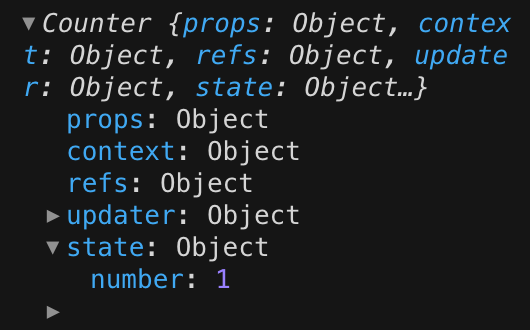
handleIncrease 메서드 바인딩 후 this 값 메서드를 바인딩하거나 state를 초기화하는 작업이 없다면, 굳이 컴포넌트에 생성자를 구현하지 않아도 된다.
하지만 화살표 함수를 사용하지 않았기 때문에 this를 찾지 못함 이런 경우 생성자를 구현하여 컴포넌트가 마운트 되기 전에 handleIncrease 메서드를 바인딩 해줘야한다.
constructor 는 컴포넌트가 생성될 때마다 자동으로 생성되는 함수로 컴포넌트가 마운트되기 전에 호출된다.
React.Component를 상속한 컴포넌트의 생성자를 구현할 땐 그 안에 super(props)를 호출해야한다. 그렇지 않으면 this.props가 생성자 내에서 정의되지 않아 버그로 이어질 수 있다.
constructor 안에서 this.props에 접근하고 싶을 땐 super(props) 를 부르면 된다.
Props 와 State 정리
Props
부모가 자식한테 넘겨주는 값으로 읽기전용
State
컴포넌트 자신이 가지고 있는 값으로 변경할 수 있음(setState() 함수를 사용하여)
'Programming > React' 카테고리의 다른 글
React shouldComponentUpdate 컴포넌트 최적화 (0) 2020.05.12 React에서 map 메소드를 사용하여 배열 렌더링 (0) 2020.05.09 React 자식 컴포넌트에서 부모로 데이터 보내기 (0) 2020.05.09 React input 상태관리 실시간 패스워드 체크하기 (0) 2020.05.08 React Class Component / Function Component (0) 2020.05.07